Salted Nut-Roll Bars


About a year ago my Mom started making these & they quickly became my husband's new favorite.  These bars are great for those who love salty & sweet.  Or those that just don't like (Lord have mercy on their souls) traditional desserts or chocolate.  This unique desert is a crowd pleaser & one that most people haven't had before.  If you need to bring a dessert to a potluck & don't want to duplicate make these babies, I guarantee no on else will bring them.  They are a great mixture of salty & sweet, crunchy & chewy.  Give 'em a try, here's the how:
Ingredients
1(1lb) package peanut butter cookies (like Nutter Butters)
1  1/2 sticks unsalted butter
2 cups peanut butter chips
2/3 cup light corn syrup
1 teaspoon vanilla
2 cups miniature marshmallows
2 cups dry roasted peanuts
2 cups Rice Krispies
Directions
Preheat oven to 350 degrees.  Coat a 9x13 inch baking pan with non-stick spray.  Pulse cookies in food processor until they are fine crumbs.  Melt 1 stick of butter & add to the cookie crumbs, pluse food processor until crumbs clump together.  Press crumbs into the prepared baking pan & bake for 15 minutes or until golden brown.
Melt peanut butter chips, corn syrup, remaining butter & vanilla in a saucepan over medium low heat.  Stir constantly until smooth & incorporated together.  Spread half cup of the peanut chip mixture over the cookie base.  Top with marshmallows & return to oven.  Bake until marshmallows puff, about 2 minutes, & remove from oven.  Do not let the marshmallows get brown.
Mix peanuts & cereal with remaining peanut chip mixture until well coated.  Drop spoonfuls of the topping over the marshmallows.  Spray a spatula with non-stick spray & smooth out the top of the bars.  Cool bars before serving.  Enjoy!

Chinese Chicken Salad

I love cool refreshing Summer dinners.  Ones that make you actually want to eat despite the relentless heat.  Well, this salad fits the bill.  It requires very little oven/stove action & you can make it in the morning so that's it just ready to go come dinner time.  Pair it with some fresh fruit & a cooling drink & you're set.  Super easy, super yummy, & super cooling... I like it!  Here's the DL...
Ingredients
2/3 cup canola or vegetable oil
4 tablespoons sugar
1 teaspoon salt
4 tablespoons cider vinegar
2 teaspoon flax seed (sesame seeds work too, I just like the color of the flax seed)
small head of cabbage shredded or chopped
2 tablespoons chopped chives
2 packages Ramen noodles, uncooked & broken up
2 chicken cooked chicken breast
Directions
Cut chicken breast into small chunks.  In a bowl mix the oil, sugar, salt, vinegar & flax seeds.  Add cabbage, chives, & Ramen noodles & mix well.  Add in chicken & stir to coat.  Cover & set in fridge for at least 1 hour before serving.  Enjoy!

The New Stomping Grounds

I've been super busy the last few weeks renovating our new house.  Last October we sold our house in town.  We didn't find a place we liked right away so we moved out of town thirty miles to my family's horse ranch.  And the next month we didn't find a house, and the following month we didn't find a house, and the next mon- well, you get the idea.  But at the end of June we finally closed on a house we absolutely love!  The real kicker is it's on the same street I grew up on.  In fact today driving home I took the left turn towards my childhood house instead of a right to go to my actual house.  I was zoning out & muscle memory just took over.  I'm sure the neighbors are already wondering about me.  That & the fact that my son ran around buck naked in the yard for 20 minutes before I saw him & made him put some shorts on.
Back on track, it's a great house up in the mountains, but only 5 minutes from town.  There is wildlife everywhere & the neighborhood is wonderful.  The house was in good shape but needed some revising to fit our large family of six.  There were only 3 bedrooms when we bought it.  The upper floor is our master suite & my hubby's office.  The main floor is the living area, kitchen, & bathroom/laundry room.  The basement has a family room, the other two bedrooms, a tiny bathroom & a large storage area.  The storage area made this weird "L" shape around the bathroom & behind on of the bedrooms.  So our major project is moving the bathroom back & making it bigger to accommodate 3 girls (& someday teenage girls) & adding a fourth bedroom.  We also are putting a shower on the main floor bathroom (which only had a sink & toilet) so our son can have a bathroom to use as well.  I could just picture my kids as teenagers & my poor son never getting a shower or being able to brush his teeth because his three sisters were constantly in the bathroom.

So for the past few weeks we've been bouncing back & forth from our new house & the ranch.  I've been painting, wiring, replacing light fixtures & tearing stuff down. Here are some before & after pictures.  Let me know if you have any cool ideas for stuff.


There was way too many variations of wood grain in our great room.  So I had my husband stain the fireplace wall white.  I think it really enhances the fireplace & adds some good contrast to the room.


We had to bring the banisters up to code before we closed, lenders requirements.  Which was fine because we would have done it anyway.  We decided to just make it a wall.  It made a spot for my piano & also will cut down on noise from the basement.  We are installing LED lights along the stairway for the dark hours.  They are light sensitive & will automatically illuminated once it gets dark.


We also had to have the outside deck railings brought up to code.  It amazes me that people have lived in this house since 1975 & no one has ever had railings on this deck.  I was afraid I was going to fall through the gaps were so big.  I love how it looks now.  Next year we will do some exterior painting.  Shoot me your ideas for colors, I'm not so wild about everything being pea green.
I'll post more before & afters as we move along.

Sloppy Joes

If you got this recipe way back from this blog bare with me.  I need to re-post a few recipes since the revamp of The Mixing Bowl page.   Plus I made these last night & am always so happy how easy they are & how much everyone loves them.  I finish off my Sloppy Joes with a butter toasted bun & some cheese.  My hubby likes to add pickles.  You can really get creative with toppings to make them more fun.  
If Sloppy Joes have a bad name in your life try this from scratch recipe.  They're nothing like the hot lunch ones you had in grade school.  And they please young & old, male & female, cosmopolitan & redneck alike.  They also make a great finger food for a get together or child's party if you make them as sliders on rolls or mini hamburger buns.  Here's the word on the street...
Ingredients
2 Tablespoons Butter
2 pounds ground beef/elk/deer
1/2 onion diced
1/2 green bell pepper diced
3 garlic cloves minced
1 1/2 cups ketchup
1 8oz can tomato sauce
1 cup water
2 tablespoons brown sugar
3 tablespoons Worcestershire sauce
1 teaspoon mustard
1 teaspoon paprika
salt to taste
2 teaspoons hot sauce or chili powder (optional)
Directions
In large skillet cook ground beef  until brown.  Remove from skillet & drain fat.  Add butter, onions, green peppers & garlic to the skillet and cook until soft, about 5 minutes.   Add ketchup, tomato sauce, water, brown sugar, Worcestershire sauce, mustard, hot sauce, & paprika. Stir to combine and simmer for 15 minutes, adding salt to taste.   Serve on butter toasted hamburger buns, top with cheese or pickles if you like. 

Here's some exciting news: recipes are now easier to find on my blog!  I have redone The Mixing Bowl page & it is now an index of all the recipes I post.  This should help you find recipes & meal ideas easier.  Let me know what you think or if it's working right.

Homemade Fun

During the Summer I'm always looking for fun & new projects for my kiddos.  Things that use creativity are often on the docket.  While in Target a few weeks ago I found these make at home bouncy balls.  And if there's one thing my monkeys love it's bouncy balls.
The kit was only $5 & requires very simple steps.  The only thing you need to provide is room temperature water & guidance 
This project was perfect for my three & six year olds because it had fairly quick results.  Only about 15 minutes from start to finish.  And afterwards they could play with what they made.  It's very hands on & is a good mixture of science & art.
Another bonus is that the balls really bounced & held up.  We made one big ball & two of the little astrix looking balls.  Plus we have enough left to make another big ball or two smaller balls.  Well worth your money & a fun project to do with you kids.  I may have even bounced the balls a few times myself.

Chicken BLT Salad

 Salads & Summer are the perfect combination.  A crisp cool salad is the perfect way to enjoy a meal on a hot day.  I like salads that are hearty enough to pass as the main dish.  Which is why I love this salad... & the fact that it has bacon... & blue cheese.  This salad is filling, tasty, & super easy to make.  You can even cook the chicken & bacon in the morning & throw it in the fridge.  That way in the heat of the day when it's time for you to make dinner you don't have to turn on your stove.  This one is also a crowd pleaser, satisfying a wide range of taste pallets. And did I mention that it has bacon in it?!
Ingredients
6 slices bacon cut into 1 inch pieces
2 cups chicken cooked & cut up (about 1 inch chunks)
1 cup halved Cherub, Cherry, or other small tomato
4 ounces blue cheese
2 Romaine lettuce hearts chopped
Directions
Cook bacon over medium heat until crispy.  Remove bacon from pan & set on paper towel to drain.  Make sure chicken & bacon are cooled to at least room temperature before assembling salad.  Gently toss bacon, chicken, tomatoes, & lettuce.  Crumble Blue cheese on top & gently toss again.  Drizzle with Ranch dressing & serve.  Enjoy!

Side dish idea: fresh fruit & a good bread

Roy Rodgers

One thing I love is flavored sodas, like real flavored sodas.  Not the canned stuff, but rather the kind that are mixed by hand with flavored syrups.  I can guzzle down a green river or chocolate soda any day.  One of my favorites is flavored good ol' Coca Cola.  When I was a kid my Mom use to take me to a soda shop in the town she grew up in to get flavored Cokes.  While I really like chocolate Coke, my favorite was always cherry Coke, otherwise known as a Roy Rodgers.
What's great about cherry Coke is that it only requires three ingredients.  And those two ingredients can be found in your neighborhood grocery store.  All you need is...
Ingredients
1 tablespoon Grenadine Syrup
12 ounces of Coca Cola
ice
Directions
Pour syrup into a large glass.  Add Coca Cola & stir until incorporated with syrup.  Add plenty of ice & drink immediately.  Enjoy your authentic Roy Rodgers/Cherry Coke!

Cowboy Birthday Party

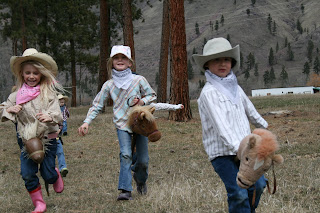
Back in the Spring my son turned three.  We decided he was old enough to appreciate a birthday party, so we threw him his first one.  Since it was his first real birthday party ever I wanted to make it big & special.  We had a ton of people over & the day was full of busyness.  My boy is absolutely obsessed with cowboys, go figure, so of course he wanted a cowboy party.  I found it increasingly hard to get affordable cowboy party ideas, I waded through tons of websites.  So I compiled some ideas & pictures here for you in case you have a little buckaroo's party to throw.
First the cake.  This is one of the things I really wanted to do up.  I made two 9 by 13 inch white cake layers with chocolate in between & two 9 inch chocolate cake layers with raspberry in between.  I froze the cake layers before I started assembling it.  This made them easy to trim & work with.  I frosted the bottom layer with white first & then outlined the black print with a frosting bag.  I filled in the black area using a knife.  The top layer was frosted all denim blue & then I put white star shapes around the top.  I made a red stripe around the middle using my frosting bag & then decorated it with whit & black shapes like a bandanna.  Green dyed coconut made the "grass" around the entire cake & chocolate licorice is the rope around the base.  A toy cowboy & calf adorn the top & the fence pieces are also toys.
Guests were asked to where their cowboy gear & I placed extra stuff I had on the porch for anyone who needed more accessorizing.  Each kiddo received a bandanna upon entering the party.  I got bandannas real cheap from Oriental Trading Company.
Party favors were put in brown paper lunch bags & tied with a piece of bailing twine.  Bags were filled with a sheriffs badge, gold coin gum, a piece of fruit leather, a toy plastic horse, mini cowboy notepad, Hershey's Gold Nuggets candy, and a cowboy magnet craft.  I got most of this stuff from Oriental Trading Company, they are a great resource for parties!


The name tags I found in Google images.  I printed them off in business card size & then hand wrote each child's name on it.
I set sidewalk chalk out on the patio for a little extra something to do.  But kids had plenty to do...
We had a pile of dirt in the yard to fill in some holes.  I hadn't gotten to this landscaping project before the party so I just threw some kid shovels, rakes & buckets on the pile.  It was a big hit.
We had stick horse races.
And at the end each rider won a ribbon.  We have buckets of these from horse shows, but I be you could find generic ones online.
Our friend is a team roper so he brought out his ropes & roping dummy & gave all the buckaroos a lesson.  The kids loved it!
And when the dummy was being used for roping it made a great bull for riding.
There was a branding lesson as well, & each kid got to take home a block of wood that they branded themselves.
Of course there were horseback rides.
And we played Hunt in the Hay.  Coming from a long line of dairy farmers & ranchers this game was a staple kid game at our family reunions.  Basically you take a bale of hay & break it up & then hide a bunch of goodies like little toys, candy, & such.  On three all the kiddos run to the pile of hay & dig through to find whatever treasures they can.  It's kind of like a western version of the pinata.
For grub I put out snacks in metal camping dishes & mason jars.  There was trail mix, licorice, chips & salsa, & peanuts (still in their shell of course).  For lunch I served pulled pork sliders, baked beans, coleslaw, & homemade mac & cheese.  I got great cups, plates, & table clothes from Birthday Direct.  I used outgrown cowboy boots, hats & bandannas to decorate with.  I folded bandannas in half & tied the ends together to make a cowboy banner across the front porch.

Hope this helps in your party planning endeavors.  Cowboy up!
Super Easy Roasted Potatoes

I love dishes that are easy to make, taste delicious, make large quantities, & cost very little.  Thus, I love these potatoes.  My Mom made these while I was growing up & we always gobbled them down as fast as we could.  They go great with anything & if your asked to bring a side dish to a pot luck these are the ticket.  Here's how you whip up the easiest hearty potato dish ever...
Ingredients
6 medium Russet potatoes
1 package of onion soup mix
1/3 cup olive oil
1 teaspoon thyme
1 teaspoon kosher salt
Directions
Preheat oven to 375 degrees.  Wash potatoes & cut in half, then cut in half again, then cut in thirds.  This should give you about one inch cubed potato squares.  Place cut up potatoes & remaining ingredients in a large Ziploc bag.  Seal the bag very, very well & then start shaking it around until all the potatoes are evenly coated.  Pour potato mixture into a 9 by 13 inch baking dish.  Place in preheated oven & cook for about 1 hour or until potatoes are fork tender.  Serve immediately & enjoy!

Skillet Chocolate Chip Cookie

I adore chocolate chip cookies, especially the dough phase of the cookie making process.  Whipping up the dough is no problem for me.  Mostly because I eat spoonfuls of it as I go.  But when it  comes to dropping those cookies on the baking sheet & popping them in the oven over & over I'm not as enthusiastic.  Often to avoid this process I make cookie bars instead.  But they are a little more cake like & sometimes ya just want that good old crispy, gooey cookie instead.
Enter the skillet cookie, which I have renamed the Lazy Woman's Cookie.  I love this dessert.  It still taste like the chocolate chip cookie you love, gooey center & crisp edges, but you only have to make one.  Almost too easy.  The presentation of the cookie is scrumptious & home-down looking which everyone loves.  Whenever I make this my guests ooh & ahh at it & think I've slaved over a hot stove.  I love food like that, easy to make but looks like it took hours.  Cut it up like a pie while it's still warm & serve it with a scoop of vanilla ice cream on top.  I promise this cookie will not disappoint!
Ingredients
1 1/2 sticks softened butter
1/3 cup packed light brown sugar
3/4 cup sugar
1 egg
2 teaspoons vanilla extract
2 cups of flour
1 teaspoon baking soda
1/4 teaspoon salt
1 cup chocolate chips
Directions
Preheat oven to 350 degrees.  Lightly grease a 10 inch cast iron skillet with non-stick spray or vegetable oil.
Stir together flour, baking soda, & salt & set aside.  In mixing bowl using electric mixer beat butter, brown sugar, & sugar together until creamy.  Add egg & vanilla & beat until fluffy.  Add in flour mixture a bit at a time & mix well.  Mixing by hand stir in chocolate chips.  Put dough in prepared skillet & spread out evenly to edges using a silicone spatula.  Bake for 20-30 minutes or until top is light brown.  Remove & let sit for 3 minutes.  Cut in pie shape slices & serve warm.

Budget Remodel: Part Deux

My mega cheap kitchen makeover for the ranch house is complete.  I did it all for under $50 & I think it makes a huge difference.
I spent most of my money on paint.  Cupboards went white.
The business of the wallpaper was concealed with a relaxing light grey giving the kitchen a sophisticated country feel.
The kitchen is so much more peaceful & brighter.  It's amazing what a little paint can do.  
Hardware was spruced up with a fresh coat of black spray paint.  I also painted the light switch & outlet covers & the heating registers.  
And a new back splash was installed.  The black splash makes a huge difference & is very easy to do.
I used self-adhesive linoleum tiles.  These tiles were only a dollar a piece.
They basically go on like a sticker.  Very easy to use, you don't need to be handy to handle these.  
I cut them in half so they covered twice the distance.  Simply score (which means don't cut all the way through) using a straight edge & a utility knife.  Then bend the tile at the score & it will break off evenly right where you need it to.

The before & after say it all.  You don't need to spend a lot of money to change the entire look of your kitchen.  Just use what you've got & spruce it up a bit with paint.  Also reorganize & de-clutter, this can give your kitchen a whole new feel.  Remodeling doesn't mean you have to break the bank.