Cherry Pie Bars

Nesting Corral ~ Cherry Pie Bars
Yesterday was incredibly sunny.  It was so nice to see the sun again after a few months of darkness.  The sun got me thinking about summer, which got me thinking about summer fare, which in turn made me want a fruit pie!  I neither had the time or ambition to actually make a fruit pie, so I did the next best thing.  I made these cherry pie bars.  These are super easy to whip up, no peeling or pitting fruit, and no crust to roll out.  And they taste so delicious!  Of course you could make this with real fruit, and any variety of fruit.  But I wanted something quick and easy, so I went for the canned pie filling.  The only canned pie filling I really like is cherry pie filling, so the choice was easy (plus it was in my pantry).  The sugar cookie type crust with the sweet syrupy cherries topped with a cream cheese glaze is summer in a dish, a quick dish.   Here's the scoop on the lazy mans (but oh so good) version of cherry pie...
Nesting Corral ~ Cherry Pie Bars
*I only made a half batch, full recipe will make twice as much as pictured

Ingredients
1/2 Cup butter, softened
1 Cup sugar
2 eggs
1 teaspoon vanilla
1/4 teaspoon almond extract
3Cups flour
1/2 teaspoon salt
1teaspoon baking powder
1 large can (30 oz) cherry pie filling
Cream Cheese Glaze:
     6 ounces cream cheese, softened
     3/4 Cup powdered sugar
     1/2 teaspoon vanilla

Nesting Corral ~ Cherry Pie Bars
Directions
Preheat oven to 350 degrees.

With electric mixer beat butter.  Add sugar and beat until creamy.  Add eggs, one at a time.  Mix in vanilla and almond extract.  Add flour, salt and baking powder.  Press dough evenly into greased 9 inch by 13 inch baking dish.

Bake for 30 minutes, or until edges begin to brown.  Allow to cool completely before adding glaze.

For the glaze beat cream cheese, powdered sugar, and vanilla until smooth.  Spoon into piping bag or sandwich bag with a corner cut off.  Pipe glaze in lattice patter on cooled bars.  Cut into squares and enjoy!

Patriotic Trifle

It's almost here folks!  A true mark of summer, the Fourth of July.  I love this holiday!  The weather is always nice, everyone is in good spirits, it usually involves BBQ, you get to lay in the sun and play in the water, fireworks end the day, and of course there's amazing food.  Forth of July fare is comfort food at its finest.  One thing I particularly enjoy about cooking for this holiday is the abundance of fresh fruit.  The pies are one of the best parts for sure.  But If you're looking for something maybe a little cooler and more refreshing this trifle fits the bill.  Nothing but fresh fruit and homemade whip cream, you can't beat it.  What better way to celebrate our independence from the English than by eating a dessert they created but putting an American twist on it!
Ingredients
{amounts may vary depending on the size of your trifle dish}
4 cups fresh blueberries
4 cups halved fresh strawberries
3 cups heaving whipping cream
3 teaspoons vanilla
1/4-1/2 cup granulated sugar to taste

Directions
Using an electric mixer add the whipping cream, vanilla and sugar (add more sugar if you like it sweeter).  Whip on high speed for about 3 minutes or until stiff peaks form.  (Don't mix too long or it will turn into sweet vanilla butter!)

In trifle dish put a layer about an  inch thick of whipping cream.  Then using about 3 cups of the blueberries spread evenly over the whip cream.  Next add another layer of whip cream, this time about 2 inches thick.  Next add a  layer of about 3 cups of the strawberries.  On top of the strawberries add another 2 inch layer of whip cream.  Now you can decorate the top how you like.  I put a ring of strawberries on the outside, with a circle of blueberries in the middle.  Then I put a dollop of whip cream in the middle of the blueberries and added a final strawberry on top.

Keep refrigerated until ready to serve.  Serve on top of vanilla bunt cake or all on its own, both ways are delicious.  Enjoy! Serves about 10.


Warm Potato Salad with Bacon Vinaigarette


Summer is coming!  I'm holding out hope even though it snowed yesterday.  That means it's time to get outdoor and grilling fare on the menu.  I found this recipe last summer and was addicted to it from the first bite.  This dish is so good and is a nice alternative to the traditional mayonnaise based potato salad.  Plus you serve it warm or at room temp, so no worrying about how to keep it cool on a hot sunny day.  Here's the DL...
Ingredients
2 pounds potatoes, washed and cubed into 1 inch pieces (I have used all kinds of potatoes on this recipe and they all turn out good.  In the picture I used a mix of Yukon Gold and red potatoes)
2 Tablespoons olive oil
1 teaspoon salt
1/4 teaspoon pepper
1/2 medium onion, thinly sliced
1 Tablespoon sugar
2 Tablespoons butter
6 strips bacon
1 Tablespoon parsley

Vinaigrette Ingredients
warm bacon drippings
3 Tablespoons apple cider vinegar
2 teaspoons sugar
1/2 teaspoon Dijon mustard
1/8 teaspoon thyme
1/8 teaspoon oregano
1/4 teaspoon pepper
1/4 teaspoon salt
1 Tablespoon olive oil

Directions
Preheat oven to 400 degrees.

In a bowl mix potatoes, olive oil, salt and pepper.  Stir to coat.  Drizzle a little olive oil on a baking sheet.  Put coated potatoes on baking sheet and roast for 35-40 minutes, or until tender and golden brown.

Meanwhile, in small pan over medium heat melt the butter.  Add the onion and the sugar.  Stir to coat and let cook 10-12 minutes, turning occasionally, or until onions are tender and caramelized.

In medium sized pan over medium heat cook bacon until brown and crispy.  Remove bacon and let drain on paper towel.  Leave drippings in pan.

While drippings are still warm, over low heat add all the vinaigrette ingredients.  Whisk well until everything is incorporated and slightly thickened.  

Put hot potatoes into a large bowl.  Crumble the bacon and sprinkle on top of the potatoes.  Add the onions, parsley, and the warm vinaigrette to the potatoes.  Stir well until everything is coated.  Serve warm or at room temperature and enjoy!  Serves 6. 


Old Fashion Pancakes


Few things are as good for breakfast (or occasionally dinner) as pancakes.  This simple, basic, old fashion recipe for pancakes fits the bill.  These pancakes are fluffy, flavorful, and filling. And they're made with staple ingredients and mixed by hand.  Nothing like going back to the original recipe to make a good ol' standby like pancakes.  Your hungry crew won't be disappointed!  Here's the skinny...
Ingredients
3 cups flour
2 Tablespoons sugar
2 teaspoons salt
5 1/4 baking powder
2 eggs, lightly beaten
2 1/2 cups milk
1 teaspoon vanilla
4 Tablespoons butter, melted & cooled

Directions
Mix flour, sugar, salt, and baking powder.  Make a well in the center of the flour mixture.  Add eggs, milk, vanilla, and butter into the well.  Slowly stir until all the ingredients are incorporated.  Batter will be slightly lumpy.  Let batter sit for 5-10 minutes.
Meanwhile heat griddle over medium-high heat.  Coat griddle with butter or canola oil.  Pour about 1/4 cup batter per pancake on the hot griddle.  Flip pancake when bubbles start to rise to the top.  Continue to cook pancake until bottom is golden brown.
Serve pancakes warm with butter and syrup.  Enjoy!  Makes 24-26 six inch pancakes.

Chocolate Shot Cookies


It's been ages since I've posted a recipe!  I meant to post this one back in June, but life as a pregnant mother of four kind of took over.  Now I'm a not pregnant (thank goodness) mother of five!  But the last nine months of physical misery was worth it because now we have this beautiful bundle, Mikkelsen (Mikkie) Faith, in our lives.
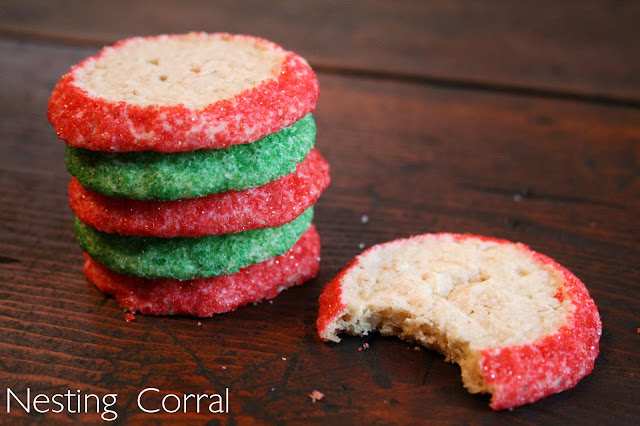
She is already a month old!  And while life hasn't slowed down, I really wanted to get back to blogging a bit.  So today is the big day and I'm sharing this scrumptious recipe for my hubby's favorite Christmas cookie, Chocolate Shots.  These cookies are simple to make and so light, crispy and yummy.  They will disappear quickly, guaranteed!  Here's the DL...
Ingredients
1 cup butter, softened
1 cup powder sugar
1 cup oatmeal
2 teaspoons vanilla
1/2 teaspoon baking soda
1 1/2 cups flour
Red and green granulated sugar
Directions
In mixer cream butter.  Add powder sugar.  Gradually add the oatmeal.  Mix in vanilla, baking soda, and flour.  Divide dough into two equal parts and form into rolls about 2 inches in diameter.  Coat one roll of dough in red sugar and the other in green sugar. (I do this by pouring the color sugar out on a piece of wax paper and gently rolling the dough through it until the outside is coated.)
Wrap rolls of dough in wax paper and chill for at least one hour.
Preheat oven to 325 degrees.
Slice chilled dough about 1/2 inch thick and bake on ungreased cookie sheet for 12-15 minutes, or until lightly browned.  Let cool and enjoy!

*I asked my mother in law why these cookies are called Chocolate Shots when there is no chocolate in them.  She said the original recipe called for coating the dough in chocolate sprinkles instead of sugar.  I've tried it both ways and I prefer the sugar coating.


Red, White, & Blue Punch

Here is a yummy, easy and refreshing way to spruce up your Fourth of July party.  Pulling this punch together couldn't be more simple.  Plus it taste so good and the mint slowly infuses into the punch and makes it ultra refreshing on a hot summer day.  Here's the DL...
Ingredients
White Grape Juice
Sprite
3-5 sprigs of mint
2 cups of fresh blueberries
2 cups of fresh raspberries
Directions
Mix the well chilled white grape juice & sprite together in your beverage container using a one to one ratio.  Pour in the blueberries and raspberries and stir around to mix them up.  Put in the mint and give it one stir.  Enjoy!

Buffalo Chicken Quesadillas


It has been ages since I last posted!  Sorry for the unexplained absence, but in February we got a BIG surprise that I was pregnant.  Pretty much the next day morning sickness set in and stayed there for four solid months!  I've gotten fairly sick with all my pregnancies, but this one was a doosey.  I pretty much couldn't do anything, our family was in full survival mode.  If it wasn't for our family and friends we would have had cold cereal for every meal.  But we got blessed and folks brought us a lot of dinners.  This however meant I did very little cooking, and what I did do was super basic.  But I am now feeling better, as in I'm done throwing up every day.  Just the aching feet,back, and legs and basic uncomfortableness to deal with now.  But I am cooking again, which makes my family very happy.  And the most important thing is our baby is healthy.  I'm five months along and we are having another girl!  Its a house overran by ladies here.  My hubby and son will just have to sick together and take hikes when things get to be too much ;)

These buffalo chicken quesadillas are one of the few new things I've tried over the last five months.  I saw a recipe for BBQ chicken quesadillas, and I thought, "Those sound good but  buffalo chicken would be better!"  So I gave it a whirl and I can't believe I've never thought of this before.  They are super easy and so, so tasty.  Serve 'em up with some ranch for dipping and you'll be a happy camper.  Here's the DL...

Ingredients
1/4 cup butter, melted
1/4 cup Franks hot sauce
2 teaspoons vinegar
2 cups chopped cooked chicken
1 1/2 cups shredded Monterrey Jack cheese
1/2 cup blue cheese crumbles
butter for grilling
6 flour tortillas

Directions
Preheat oven to 300 degrees.
Whisk together the melted butter, Franks hot sauce and vinegar.  And mixture to chicken and stir to coat.
Heat a skillet over medium heat.  Throw in a little butter and lay down a tortilla.
On half of the tortilla spread a sixth of the chicken, shredded cheese, and blue cheese.  Put a lid on until cheese is melted and tortilla is browned.
Gently fold over the side of the tortilla with nothing on it to make a half circle.
Set quesadilla in the oven on a cookie sheet and repeat with remaining tortillas.
Serve warm with a side of ranch and enjoy!

*You can add other ingredients like chopped green onions, bacon, parseley, or whatever else goes good with buffalo chicken in your mind.