Skillet Chocolate Chip Cookie

I adore chocolate chip cookies, especially the dough phase of the cookie making process.  Whipping up the dough is no problem for me.  Mostly because I eat spoonfuls of it as I go.  But when it  comes to dropping those cookies on the baking sheet & popping them in the oven over & over I'm not as enthusiastic.  Often to avoid this process I make cookie bars instead.  But they are a little more cake like & sometimes ya just want that good old crispy, gooey cookie instead.
Enter the skillet cookie, which I have renamed the Lazy Woman's Cookie.  I love this dessert.  It still taste like the chocolate chip cookie you love, gooey center & crisp edges, but you only have to make one.  Almost too easy.  The presentation of the cookie is scrumptious & home-down looking which everyone loves.  Whenever I make this my guests ooh & ahh at it & think I've slaved over a hot stove.  I love food like that, easy to make but looks like it took hours.  Cut it up like a pie while it's still warm & serve it with a scoop of vanilla ice cream on top.  I promise this cookie will not disappoint!
Ingredients
1 1/2 sticks softened butter
1/3 cup packed light brown sugar
3/4 cup sugar
1 egg
2 teaspoons vanilla extract
2 cups of flour
1 teaspoon baking soda
1/4 teaspoon salt
1 cup chocolate chips
Directions
Preheat oven to 350 degrees.  Lightly grease a 10 inch cast iron skillet with non-stick spray or vegetable oil.
Stir together flour, baking soda, & salt & set aside.  In mixing bowl using electric mixer beat butter, brown sugar, & sugar together until creamy.  Add egg & vanilla & beat until fluffy.  Add in flour mixture a bit at a time & mix well.  Mixing by hand stir in chocolate chips.  Put dough in prepared skillet & spread out evenly to edges using a silicone spatula.  Bake for 20-30 minutes or until top is light brown.  Remove & let sit for 3 minutes.  Cut in pie shape slices & serve warm.

Budget Remodel: Part Deux

My mega cheap kitchen makeover for the ranch house is complete.  I did it all for under $50 & I think it makes a huge difference.
I spent most of my money on paint.  Cupboards went white.
The business of the wallpaper was concealed with a relaxing light grey giving the kitchen a sophisticated country feel.
The kitchen is so much more peaceful & brighter.  It's amazing what a little paint can do.  
Hardware was spruced up with a fresh coat of black spray paint.  I also painted the light switch & outlet covers & the heating registers.  
And a new back splash was installed.  The black splash makes a huge difference & is very easy to do.
I used self-adhesive linoleum tiles.  These tiles were only a dollar a piece.
They basically go on like a sticker.  Very easy to use, you don't need to be handy to handle these.  
I cut them in half so they covered twice the distance.  Simply score (which means don't cut all the way through) using a straight edge & a utility knife.  Then bend the tile at the score & it will break off evenly right where you need it to.

The before & after say it all.  You don't need to spend a lot of money to change the entire look of your kitchen.  Just use what you've got & spruce it up a bit with paint.  Also reorganize & de-clutter, this can give your kitchen a whole new feel.  Remodeling doesn't mean you have to break the bank.

4th of July Feast: Meat

I think it's required by U.S. law that we BBQ for the 4th of July.  If it's not a law, it should be.  You can go many routes for your BBQ main dish.
Burgers
Steak

But today I want to share with you my baby back ribs recipe; an excellent all American 4th of July dish.  I love ribs, & I mean L.O.V.E. ribs.  Many people are intimidated by ribs, but they are actually quite easy.  Here's the skinny (or not so skinny if you're mean & scarf down about 10 of these babies):
You got to start by making the rub (recipe below).  This is a combination of seasonings that you literally rub on the ribs before you cook them.  The rub makes the meat wonderfully flavorful.
Now take your hands & rub that rub all over those ribs, both sides please.
Now many people would think you throw them on the grill at this point, but I differ.  If you want a really tender rib don't just go to grillin' them (unless your smoking them, but that's a whole other post).  Cover these babies up with tin foil & stick them in a 350 degree oven for an hour.
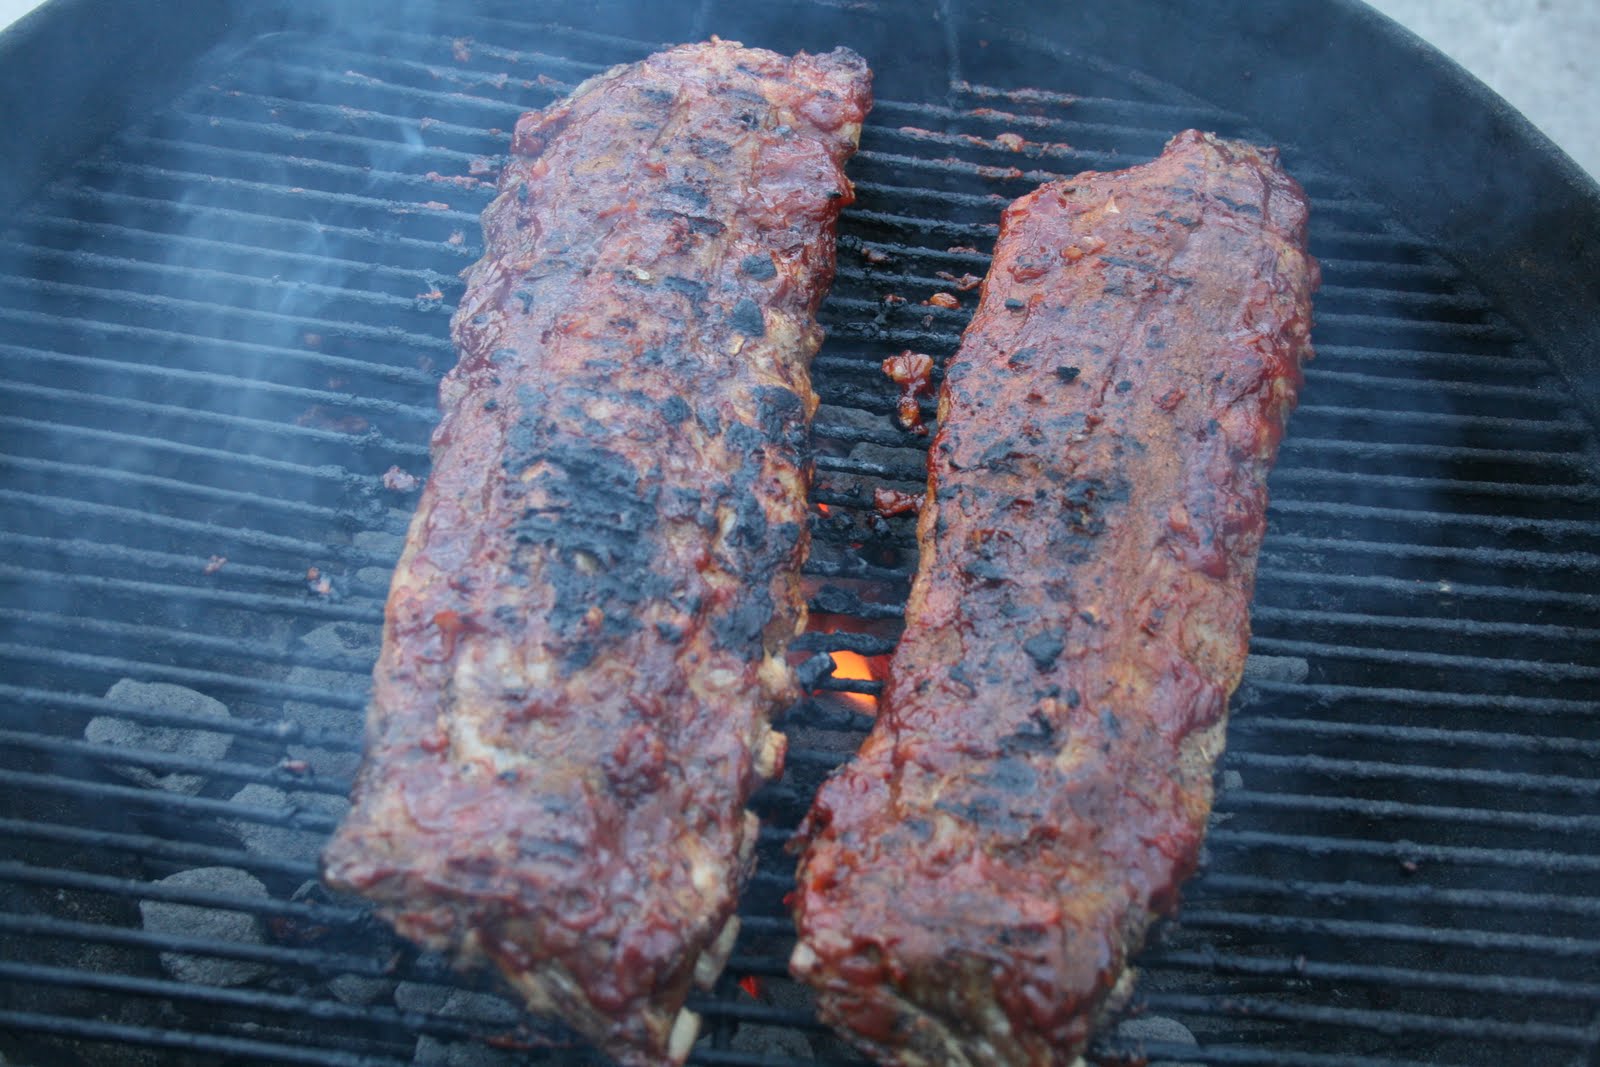
In the mean time whip you up some BBQ sauce (recipe below) & get that grill nice & hot.  Remove ribs from the oven & place on the prepared BBQ grill.  Next start slathering the ribs in BBQ sauce.
The ribs are already cooked so just grill it long enough for the BBQ sauce to caramelize & get all bubbly.
And a little charred looking... mmmm!  Now cut the ribs up by simply taking a knife & cutting in between each rib bone.
Eat em' up hot with an extra side dish of BBQ sauce.  Make sure to have extra napkins or wash clothes close by.  Enjoy your yummy Fourth of July!
Rub Recipe
2 tablespoons salt
1 teaspoon pepper
1 teaspoon garlic powder
2 teaspoons paprika
1/2 teaspoon cumin
1 teaspoon thyme
1/2 teaspoon celery seeds

BBB Q Sauce
1 onion diced
3 Tbls butter
2 cups ketchup
1/3 cup molasses
1 teaspoon mustard
2 teaspoon brown sugar
1 Tablespoon Worcestershire sauce
1/8 cup whiskey
Melt butter in sauce pan.  Add diced onion & cook until tender, about 8-10 minutes.  Add remaining ingredients & allow to simmer stirring often for at least 10 minutes.  Taste it & add more salt or sugar as desired.  It you like things a little spicy add some chili powder.  So good you could eat it by the spoonful, but I suggest using it on top of ribs.


*recipe for 2 medium size rack of baby back ribs, adjust accordingly for your size of feast

4th of July Feast: Sides


Baked beans are a staple to any Fourth of July feast.  You could make your own homemade... or you can buy these.  I love these baked beans!  Which is saying a lot because in general I do not like baked beans.  The flavor in these Bush's Bourbon & Brown Sugar Grillin' Beans is awesome & the prep time only requires a can opener.

4th of July Feast: Dessert

Do to lack of time I could not make each of these desserts, photograph, & post them.  Therefore I am sending you to other websites for these fabulous desserts (click the picture to get the recipe).  I have had each of these desserts before & they always look festive & are the hit of the party.  Enjoy!

Red, White, & Blue Parfaits
You could substitute raspberries or strawberries for the currents

Flag Cupcakes
This one is too easy.  Make your favorite vanilla or white cupcakes.  Frost with your favorite white frosting.  Add a few red & blue sprinkles if you like & stick an American flag toothpick in the center (you can find these almost anywhere right now, also available at party stores).


Red, White, & Blue Trifle
This is probably the easiest desserts to make.  You can substitute strawberries for raspberries if you like.  Or go the more traditional route & add pound cake.  This is the perfect summertime dessert.

American Flag Cake
We have this every year & it's always a crowd pleaser.  Don't have time to make it homemade?  Use boxed cake mix & pre-made frosting & decorate yourself with blueberries & raspberries (or strawberries cut in half).

The Money Saving Power of Water

I always see those Dyson vacuum commercials on tv & drool.  Oh, how I would love a vacuum that never loses powerful suction!  Unfortunately, three to four hundred dollar vacuums are not in our budget.  So I'm stuck with my Wal-Mart special Bissell.  Now, don't get me wrong, for the price I paid for my Bissell it is really doing a great job.  It's a bagless vacuum, which is great because I don't have to continually buy new bags & I can see all the dirt it is pulling up out of my carpet.  Although disgusting, I do enjoy seeing what I vacuum up!
Like most inexpensive vacuums, over time mine has lost suction.  But I figured out a trick after dealing with years of low suction.  It all has to do with the filters.  Like many vacuums, my Bissell has reusable filters.  All I have to do is rinse them out in water & let them air dry.  I did this a few months back & voile, my vacuum had suction back like the day I bought it!  I was so impressed, &  happy I didn't have to go out & have to buy a bunch of new filters, or a new vacuum for that matter.  So, if your vacuum is feeling a little sluggish check the filters.  Chances are all you need to do is rinse them out & let them dry completely.  Your vacuum will be running like new again.

The Best Way to Make Flank Steak

I'm going to share a family recipe with you today.  It's my Mom's way of making flank steak & it is one of my favorite foods of all time.  Bonus, it's super duper easy!  Pair this steak with some good potatoes & fresh green beans & you'll be sure to have a meal that pleases.  Perfect for summer... or any time really.  Here's the how:
Ingredients
1/2 cup red wine
1/4 cup olive oil
3 fresh sprigs of rosemary
4 garlic cloves pealed & smashed just until broken open
2 teaspoons salt
1/2 teaspoon pepper
flank steak
Directions
Mix all ingredients together.  Place flank steak in a baking dish.  Pour marinade over the top of the steak.  Let it sit for 20 minutes, then flip steak over & allow to sit for another 20 minutes.  Place marinated steak on a  hot grill.  Cook for 5-7 minutes per side (depending on size of steak).  Remove from grill & rest for 5-10 minutes.  Cut across the grain (very important) at an angle in thin slices.  Enjoy!