Showing posts with label Easter. Show all posts

Easy Easter Appetizer

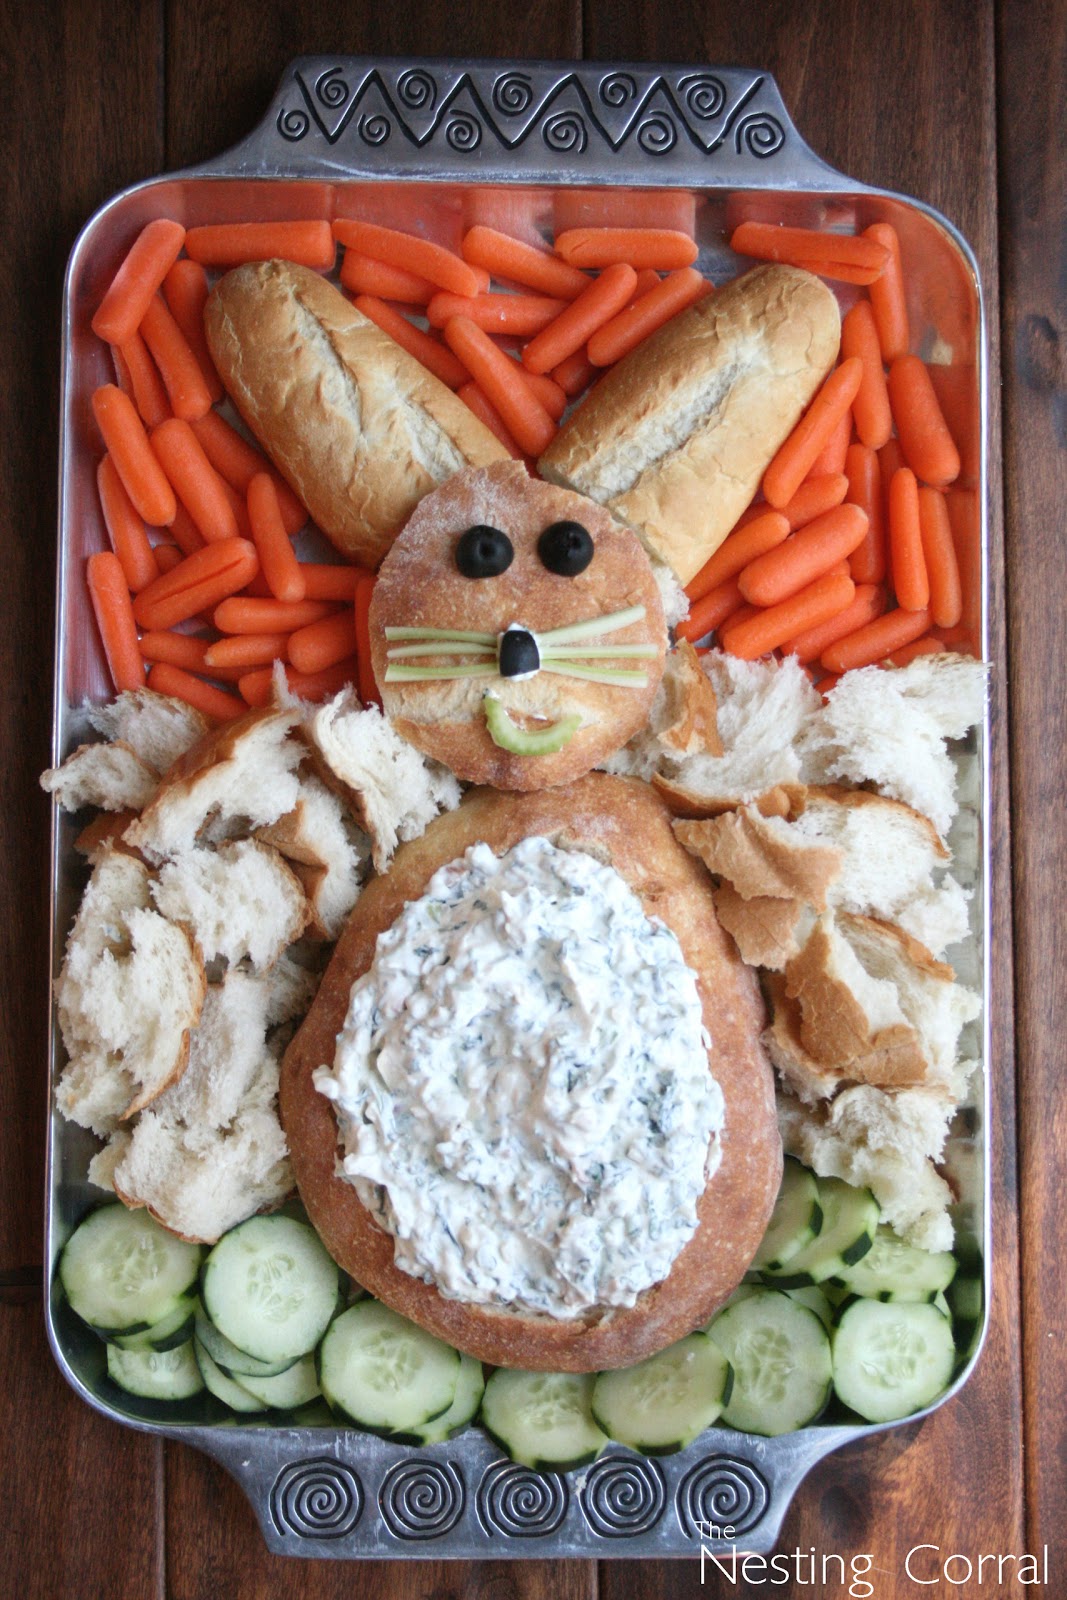
Here's  a great last minute Easter dish.  This appetizer has to be one of the easiest things to pull off.  Yet it is so fun and festive that everyone will appreciate it, especially the little ones.  This dish is also very versatile.
For the spinach dip I used the good ol' Knorr recipe (below), but you could use any dip you like.  And for dipping choose your favorite veggies, crackers, etc.  Here's how I pulled this amazing culinary masterpiece off...
For the bunny's body I got a shepherd loaf from the bakery.  I carefully cut out a circle from the top of the shepherd loaf for the bunny's head.  Then I cut the opening bigger so that dipping was accessible.  Using my hands I hollowed out the rest of the shepherd loaf so that it could hold the spinach dip.  Save the chunks of bread that you pull out for chowing down on with your dip.  Next I cut the two ends off of a baguette and situated them as the bunny's ears.
For the face I used black olives cut in half as the eyes.  I quarter a half of a black olive to make the nose.  The whiskers are thin strips of celery, and the mouth is  a cross section piece of celery.  I put a little dip on the back of each of the facial features to keep it adhered to the bread.  Lastly I put carrots, slices of cucumber, and chunks of bread around the bunny (I used half of a loaf of french bread for dipping as well).  Then I served it up!  Easy, yummy, and cute.  You can't beat that with a stick.

Here's the spinach dip recipe.  I didn't change a thing, except pulling out what peas I can from the veggie soup mix.  This is a great dip for any occasion.  I'm pretty much addicted to it.
Spinach Dip 
MAKES 4 cups dip      PREP TIME: 10 Minute(s)     CHILL TIME: 2 Hour(s)

Ingredients
1 package (10 oz.) frozen chopped spinach, thawed and squeezed dry
1 container (16 oz.) sour cream
1 cup mayonnaise
1 package Knorr Vegetable recipe mix
1 can (8 oz.) water chestnuts, drained and chopped 

Directions
Combine all ingredients and chill for about 2 hours.

Easter Chick Cupcakes

This is a quick and easy treat to whip up for the holiday weekend.  Although super cute, these cupcakes are a cinch to make and are a great way to get the kiddos involved.
We made some with brown eyes and some with blue eyes.
All my children from ages 2 to 6 helped and had a blast.  Bonus, these cupcakes are a good old fashion Betty Crocker recipe, so they taste great.  Here's the skinny...
Ingredients  
For cake:
(makes 12 cupcakes)
1 1/4 cups flour {or 1 1/2 cups cake flour}
1 cup sugar
1 1/2 teaspoons baking powder
1/2 teaspoon salt
3/4 cup milk
1/3 cup shortening
1 egg
1 teaspoon vanilla
3-4 drops yellow food coloring

For decoration:
1 container white frosting {I used Betty Crocker's Whipped Cream Cheese frosting, or you can make your own, you'll need about 1 cup}
1 1/2 cups coconut
1 package mini M & Ms
1 package peach rings
yellow food coloring


Directions
Preheat oven to 350 degrees.  Line muffin tin with festive paper cupcake liners.
Measure all ingredients for the cake into a bowl.  With electric mixer blend on low speed for about 30 seconds scraping bowl constantly.  Beat on high for 3 minutes, scraping bowl occasionally.
Fill cupcake liners about half way with batter.  Bake for 15-20 minutes or until middle is set and toothpick inserted comes out clean.  Remove from oven and let cool completely.

In small bowl combine coconut and bout 4 drops of yellow food coloring.  Stir until all the coconut is coated and yellow all over.
Using scissors, cut peach rings into small triangles for the beaks.
Sort M&Ms so that you have only the brown and blue ones.
Frost the top of each cupcake.
 
Turn upside down and gently press into the coconut.
If you need to add a little more coconut once you turn it over, gently pressing the coconut into the frosting so that it will stay put.
Gently press in the eyes and beak.
And that's it.  Your ready to gobble them up, or just look at them for a while because they're so stinkin' cute! Enjoy!

*This cake recipe is perfect for a small 8x8 or 9x9 inch cake as well.  You can withhold the yellow food coloring to keep it a basic white cake.

Goat Cheese and Garlic Potato Swirls

I know everyone is planning their Easter dinner menu.  So I thought I'd throw this recipe at you.  I came across it a while back and loved how it looked.  I'm also a big fan of goat cheese so I pretty much was hooked at the title.  These potatoes look so fancy, but take very little effort.  In fact, you pretty much do what you would do with regular mashed potatoes until the very end.  If you didn't want to take the time to make cute individual servings you could also throw these in a baking dish & serve them up the old fashion way.  These potatoes are perfect for an Easter table.  They have a wonderful orange color and with the sprig of rosemary they look so festive.  Here's the DL...
Ingredients
1 medium sweet potato, peeled and cut into 2 inch pieces
6 medium russet potatoes, peeled & cut into 2 inch pieces
6 ounces goat cheese
2-3 teaspoons salt, or to taste
1/2 cup shredded Parmesan cheese
4 tablespoons butter
3/4 cup half and half
1 teaspoon paprika
1 tablespoon melted butter
1 bunch fresh rosemary or parsley for garnish (optional)
Directions
In large pot combine potatoes and garlic and cover with water.  Bring to a boil, reduce to a simmer and cook about 20 minutes oar until potatoes are tender.  Drain and return to the pot.

Add goat cheese, salt, butter, half & half, and paprika.  Mash with potato masher until fairly smooth.  Add Parmesan and beat potatoes with electric mixer until smooth and fluffy (but do not beat too long).  If potatoes seem too thick to pipe into swirls add more half and half until desired consistency.  (If you are not swirling the potatoes you can serve them now.)

Chill potatoes for about 20 minutes.  Preheat oven to 350 degrees.
These potatoes swirls were made using the cookie sheet method.
Grease a cookie sheet or about 14 small dishes.  Using a spoon fill up a piping bag attached with a large star tip with the potatoes.  Pipe potatoes in a swirl fashion like an ice cream cone.  If doing this on a cookie sheet place potato swirls about 2 inches apart.  It is better to go tall and skinny with your swirls because they will settle as they cook.  Drizzle the tops of each swirl with melted butter.  Bake for about 10-20 minutes or until golden brown, the time will depend greatly on the size of your swirls.  Remove from oven and add a small sprig of rosemary or parsley and serve immediately.  Enjoy!

Easter Nests

My daughter Maddie doesn't live by dates or months, but rather by holidays.  Here calendar year would look something like New Years, Valentines, Easter, her birthday, 4th of July, Halloween, Thanksgiving, and Christmas.  With such a holiday conscientious child I was reminded the other day how quickly Easter was approaching.  I thought I better get some recipes posted to celebrate this wonderful holiday.
These Easter treats are a great recipe to make with kids.  They are easy and look so cute.  And they make a great treat for your child's class or to decorate your Easter table.  Here's how...
Ingredients
1 cup milk chocolate chips
2 cups dry chow mein noodles
1/2 cup coconut
green food coloring
jelly beans or candy eggs
Directions
Line two cookie sheets with wax paper.  In a bow combine one drip green food coloring with coconut.  Stir until all the coconut is green.  
Using double boil method completely melt chocolate chips.  Stir in chow mein noodles & stir to coat.
Drop noodles by spoonfuls on wax paper, making an indentent in the middle with the back of the spoon.  While nests are still warm place a pinch of the coconut in the center.  Top with a couple of jelly beans, Robins Eggs, or even a Peep.  Allow to cool completely before serving.  Enjoy!


You may also like...


Fluffy Sugar Cookies

Easter Deviled Eggs


Easter Tree Update

I know it's a few days late.  But as promised here is how my Easter tree looked for Easter day.
It bloomed beautifully.  You can tips on how to for branches on The Nest page.
The main thing I did to make sure it bloomed right on time was to keep it in a super cool place.  Then a couple days before Easter I would give it a few hours of good warmth (70 degrees or so).
And the blossoms bloomed right on time.  It was a refreshing site in a land where we are still getting snow... seriously.
And the bee was happy.

Easter Dinner: Veggie

Does anyone else always have carrots at Easter dinner?  It seems every year we do.  It must have something to do with correlation to the Easter Bunny... because bunnies eat carrots.  Hello... is this thing on?  Or maybe just because they taste good & there is no weird subconscious tie to the Easter Bunny.

Anywho... this is one of my favorite ways to make cooked carrots:
Ingredients
3 tablespoons butter
6 large carrots
dill
Directions
Preheat oven to 400 degrees.  Wash & peel carrots.
Cut carrots in half, then cut cut length wise to to 3 or 4 sections, or about 1/4 inch thick as pictured.  Fill a large saucepan with about 1/2 inch of water.  Heat until boiling & add carrots.  Cover and cook about 3 minutes, just until they are barely tender.  Meanwhile put butter on a large baking sheet & set in the oven until butter is completely melted.  Remove from oven.  Drain blanched carrots & place the carrots to the baking sheet.  Gently turn carrots to coat in melted butter.  Place in the oven for about 10-15, or until carrots start to turn light brown.  Remove from oven & sprinkle dill on the top.  Serve immediately.

Happy Easter dinner preparing!

Good Friday

Happy Good Friday to all!  Tonight I will be packing up the family & heading to church for a wonderful time of reflection.  Being a pastor's wife I particularly enjoy Good Friday because I get to go to church & enjoy it.  I don't have to get all my monkeys dressed up by myself in the early morning hours & drive everyone into town by which time they are ready for naps just in time to start a few hours of church.  Don't get me wrong, we all love going to church & enjoy worshiping the Lord & seeing our friends.  But for a pastor's wife Sundays are a little different than the average Joe.  They are definitely our busiest day of the week.  And by the time we make it home, usually around 3:30pm, we are all exhausted.  Therefore, a Friday night service that is more casual is a breath of fresh air.  My regular church duties will not be required of me, which means I get to just walk in & sit down & enjoy the service.  I do not need to dress my kids up, which means a lot less tears & yelling.  And I don't have to wake up at 6am & spend three hours trying to get everyone out the door, which means lower blood pressure for all.  I'm looking forward to tonights service for those practical reasons.  But mostly because of what we are honoring.
Having majored in Art I have seen many, many pieces depicting the crucifixion.  But for some reason this one has always spoke to me.  I can vividly see it in my minds eye & still remember the day my professor spoke on it in my Art History class.  Being a Northern Renaissance art piece the people were not painted all glamorous & perfect.  I like that the artist tried to make it as real as he could.  This painting is also full of iconography... too much to explain.  But if you look carefully I'm sure you'll see it.  For example the lamb with the cross and cradling the cup.  The artist wasn't just a crazy man, these all have very specific meanings.  But my most favorite part is over there on the right.  See that funny looking guy holding the Bible?  That's John the Baptist.  Look above his right arm, can you see the faint writing in red?  That's the part that gets me every time, those words.  Every time I see this painting & read those words I get emotional.  That small red script still speaks to it's viewers 500 years later.  It reads: Illum oportet crescere, me autem minui in Latin.  Translated it says, He must increase, but I must decrease.  And that's what it is all about. 

*read more about this art piece here

Easter Dinner: Appetizers

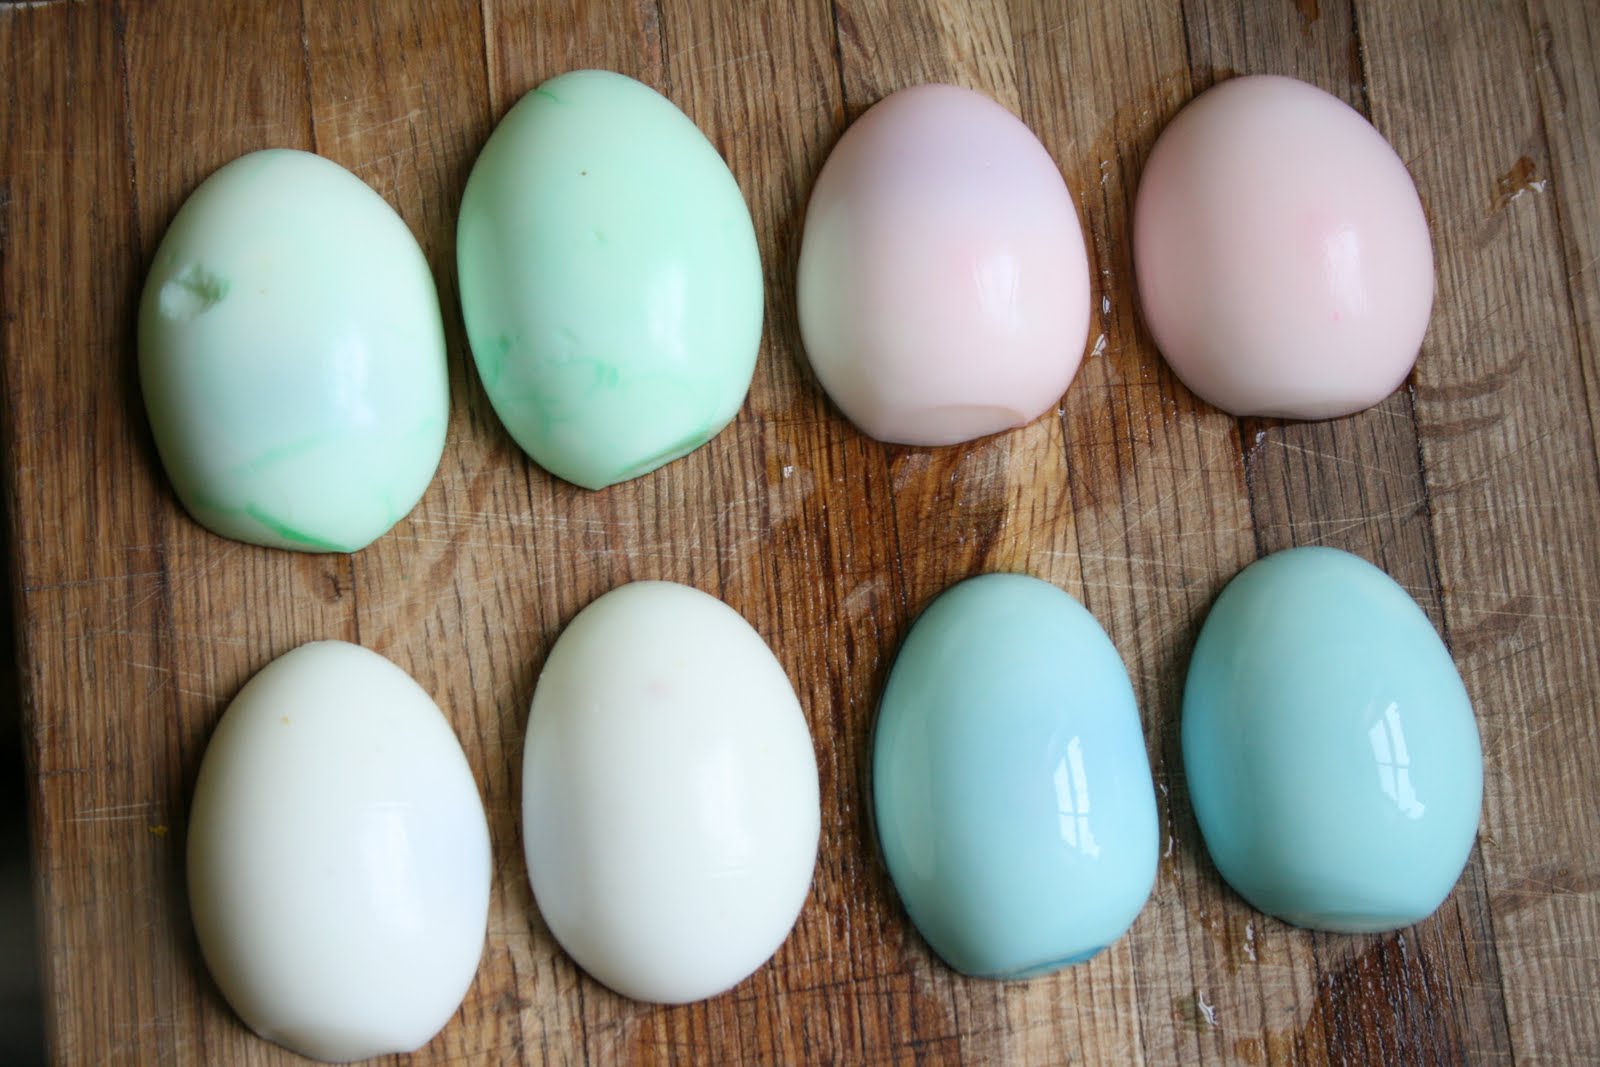
I think you're required by law to serve Deviled Eggs at Easter.  Is that an oxymoron, Easter Deviled Eggs?  I have heard of some people calling them Angle Eggs, but whatever you call them they are delicious.  I L, O, V, E, LOVE, deviled eggs.  Here is a fun twist on them for Easter:
Ingredients
6 Hard boiled eggs, peeled  (hint: run under cold water if you're having trouble getting the shells off)
1/2 cup water
package of food coloring
1 teaspoon white vinegar
Directions
Cut eggs in half & gently ease out the yolk using a spoon.  Put yolks in a separate bowl to make filling out of.
In a bowl mix 1/2 cup water with one or two drops of your desired choice of food coloring and 1 teaspoon white vinegar.  Place egg whites into food coloring mixture for 5 minutes, turn if needed half way through to get all sides of the egg dyed.
Remove egg whites & let dry before filling.

Filling
6 egg yolks
1/2 cup mayonnaise
1/2 teaspoon salt
1/2 teaspoon Paprika
dash of pepper
parsley
In a bowl smash up the egg yolks using the back of a fork (p.s. this smells awesome).
Place mashed yolks into a Zip-Lock bag & add the rest of the ingredients.  Mix together by mashing bag until everything is incorporated.  Push the filling down to the bottom of the bag.  Cut off the tip of one of the bottom corners of the bag.
Use like a frosting piping bag & fill the egg whites with about a tablespoon of filling.  Add a sprig of parsley and enjoy!  If not serving immediately cover with plastic wrap and place in the fridge.

I love this method because it is clean, easy, & quick.  Plus the eggs look so much nicer than when you fill them with a spoon.  What a festive way to enjoy an old standby!

Easter Dinner: Potatoes

It's coming folks.  Despite the snow that keeps falling from the sky (two mornings in a row here), spring is ushering in Easter... in like, a few days!  That means you need to get Easter outfits ready & pressed, Easter baskets filled with goodies, & the big one, Easter dinner prepared.  One staple of Easter dinner in our family is potatoes.  Their not necessarily prepared the same way every year, but they are there in one form or the other.  This is one of my favorite potato dishes.  It hails from me trying to recreate a potato side I had at a restaraunt a long time ago.  It's taken a few years, & although it's not exactly the same it's close.  And its yummy.  And it's easy.  Perfect for busy holidays that require your best foot forward.  Here goes...
Cheesy Potato Cakes
1 cup half & half
1 cup heavy cream
6 medium russet potatoes
4 tablespoons butter
4 chopped garlic cloves
1 diced medium onion
1 package cream cheese (8 oz), softened
3 ounces goat cheese
1 teaspoon salt
1/2 teaspoon black pepper
1 cup grated Parmesan cheese
1/2 cup blue cheese crumbles
4 tablespoons minced chives


Preheat oven to 350 degrees.  Grease a 9 x 13 inch baking dish (I use butter, but you could also use non-stick spray or another healthier option).  Scrub potatoes & then slice very thinly, if you have a mandolin that would work best, but I don't- so I slice very thinly.  Mix 1/2 cup half & half, 1/2 cup heavy cream, salt & pepper together in a large bowl.  Place potatoes in the cream mixture stir a couple of times just to coat, set aside.  


In a large skillet melt the butter & add the garlic & onion.  Cook for about 5 minutes until onions are translucent & smell delicious.  Add the cream cheese & goat cheese & stir constantly for a couple of minutes until incorporated & smooth.  Add the remaining half & half & heavy cream, stir to combine.  Add in 1/2 cup Parmesan cheese & blue cheese & stir to combine.  Remove from heat.


Evenly place the potatoes into the baking dish & press down slightly.  They don't need to be perfect but you want them fairly flat.  Pour the cheese mixture over the top of the potatoes & sprinkle remaining Parmesan over the top.  Bake for 1 hour 15 minutes or until golden on top.  Remove from oven & sprinkle chives over the top.  Loosely cover with tin foil & let it stand for 10 minutes.  Cut into single serving squares & enjoy.

This dish looks so pretty & fancy.  Bonus: it taste awesome.  Few things with Parmesan & blue cheese & cream taste bad.  Enjoy!

Easter Tree

It's officially Easter Season!  Thus the Easter Tree has been adorned on our dining room table.  I love Easter trees.  Their so clean & easy.  I always just snip a few branches from any flowering tree/bush & force them.  Then I decorate it with all these cute little ornaments that celebrate all things Spring & Easter.
And I throw a few drops of food coloring into the water to make some sort of pastel hue that speaks of Easter time.  Right now it's purple.  A few days ago it was turquoise.
I found my ornaments at craft & thrift stores.  I love how tiny they are.
If you were crafty & had the time you could even make your own ornaments to decorate your tree.  The best part is when the tree flowers, so pretty & sweet.  And it smells divine.  Once the buds pop out on this baby I'll do an update post.  Happy Easter!